Photos in this post courtesy of Newman & Wolen Design, LLC
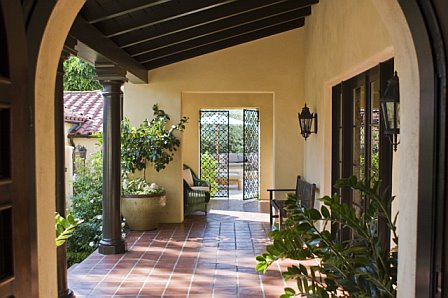
After remodel, a Spanish tiled covered walkway with columns, arches and beams leads from the front door of a Los Angeles, California home to an ornate iron gate that opens onto a posh patio and pool area. (above)
Thought I would start off the New Year with a magnificent mega house makeover from architects Tom Newman and Debbie Wolen of Newman & Wolen Design, LLC. This talented architecture and design team was able to miraculously transform an outdated California Spanish style fixer upper into a wonderful high style home.
This house's redo is so amazing...the home was featured on HGTV's “Get Out, Way Out”; the topic was exterior living spaces and how the architects redefined and rearranged them.
From outdoor to indoor, inside and out, Tom and Debbie imagined and realized a beautiful new space...making it a private gated charming updated vintage getaway and living space in the middle of the hustle and bustle of Los Angeles. A California dreamy, 6500 square foot, 4 bedroom home with maid's quarter's, a mother-in-law suite, a media room, finished basement, pool and so much more.
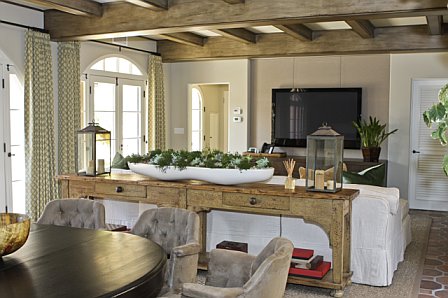
There are so many interesting stories to tell about this home's renovation...including an amazing embellished coffered ceiling found in the living room and an old garage that was cleverly remodeled into a fab modern media room.
To delve deeper and find out the full scoop, as usual, I asked architect Tom a million and half questions in a Nbaynadamas Q&A. As usual, Tom graciously told the story of this total home remodel. Here goes...
COCO: How did you get involved in this project?
TOM: The client’s contractor, Gregory Greenwood, with whom we’d worked on previous projects, thought we would be a good match for this house and client. We and Greg had worked on other Spanish style homes and both have an appreciation for these grand old houses and wonderful details.
COCO: Where is this home located in Los Angeles?
TOM: It is in the Cheviot Hills neighborhood of LA. There are several other great old homes in this area, but few are as stately as this one.
COCO: When was the home built?
TOM: 1928. A few bad remodels had happened since then; the worst being a typically ‘70s kitchen with fluorescent ceiling.
COCO: What was the goal of the project (minor remodel, remodel, total renovation, exterior, interior etc.)?
TOM: It started out as a minor remodel; new kitchen and master suite. It kept growing and growing. It was the typical situation where the client needs to determine if they want to do the piecemeal renovations over a long period of time, or make one big mess and be done. They chose the latter, but it still took a long time. Several things that seemed simple became much more complicated than anyone had hoped. Combining the old kitchen and breakfast room into one became a huge task because we had to remove a bearing wall and add a large steel beam and posts. These sorts of things can mess up the ceilings and lighting plans, but I think we managed to make it so everything seemed intentional and appropriate. Only we know the craziness behind finished walls and ceilings.
COCO: What exterior element are you most proud of now that home is complete?
TOM: The client had an image of a grillwork made from stacked clay roof tiles in sort of a fish scale pattern. It did not work were she had hoped it might (by the pool), but we used it at the entry courtyard and it think it looks great. It give the front wall some transparency and adds texture and color to what would have been a big blank wall. I also insisted they put in the fountain in the center courtyard. There was an opening in the wall that I wanted to take advantage of, and doesn’t every courtyard need a water feature? The walls of the house are all 12” thick masonry, so when you already have a hole there, you have to use it for something. I love it. Not sure if they love it as much as I do.
Front exterior of Cheviot Hills, California home. (above)
After, Side view of exterior of house from sidewalk features, the stacked Spanish roof tile grill in the perimeter wall, the new garage with arched doors and a carved wood gate entry door.
Before, side view of home from street featured a hedge and no way of accessing the home's inner courtyard. (above)
 After, a large tiled fountain adds visual interest and a serene water feature to the entry courtyard (above)
 After, view to front door from entry courtyard. (above)
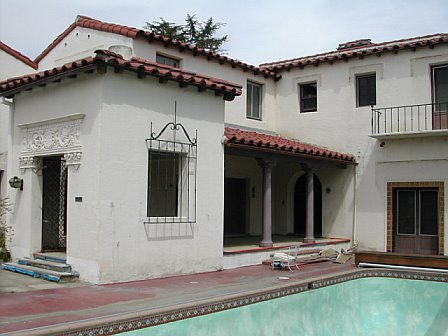
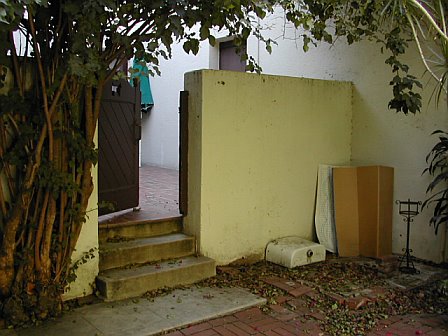
Before, the pool area was covered over to make the home's front entry way. The old patio entrance to the home with columns became the new front entry.(above)
Before, original auto court entry. (above)
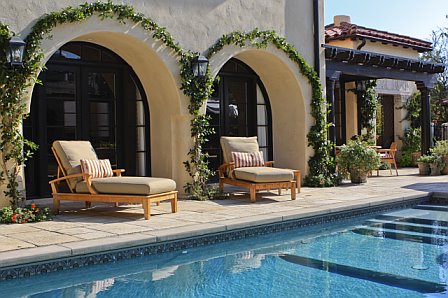
 After, former auto court or car entry is transformed into a pool side lounge space that includes an outdoor fire pit. (above)
COCO: What did you do architecturally to the exterior?
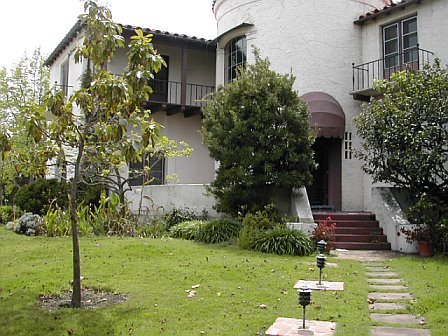
TOM: The exterior changed very little on the main house. We added a new metal cap to the main chimney that mimicked the pointed arch shape of the living room windows. We added wood beams under the old cantilevered balconies because they looked to flimsy and unstable as they were. Other things changed because rooms were repurposed. The old four car garage became a large media/family room. We kept three of the arched openings and infilled them with glass doors and with transoms. We then built a new garage with changed the look of the property from the street. The new structure reflects the style of the house and old garage, and even reused some old pieces from the main house. Old cast stone grills and wrought iron were placed on the new garage to make it feel like it had always been there. The main changes to the house were the reorganization of the exterior spaces. We removed an old ‘70s swimming pool and created a new entry courtyard which allowed us to use the original front entry door for what it was intended. (The property was subdivided some years ago and a diminutive side door became the front entrance; it never really was in keeping with the grandeur of the entry hall and rest of the living spaces to enter through the funny little door at the base of the stair tower.)
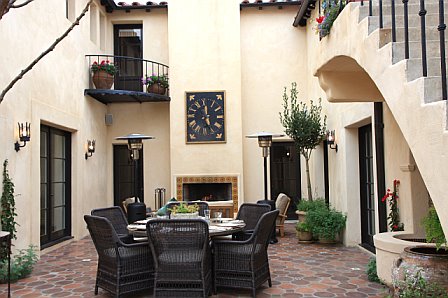
Also, the old driveway became the new pool and patio. The front yard became a walled side yard and sport court where the kids could play freely. And a divided central courtyard and back service area became a large exterior room in the middle of the house; much of the family living takes place here and an underutilized outdoor fireplace now has center stage.
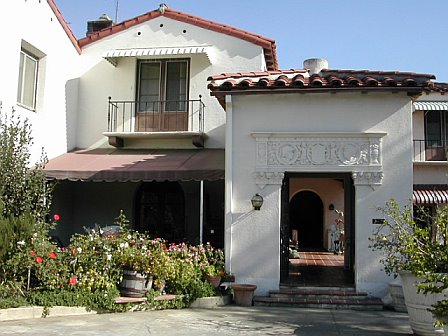
Before, Front entryway of home (above)
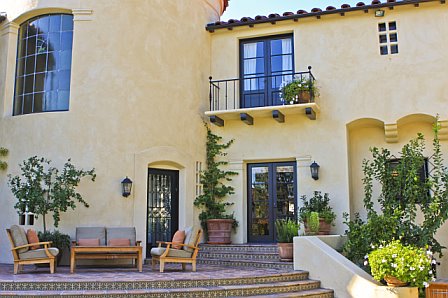
After, former front entry turns into a back patio with views of the grass and green lush backyard (above)
Before, Kitchen courtyard was small, closed off and not a useful outdoor living space (above)
After, Kitchen courtyard is built out to include a tile patio and an outdoor fireplace perfect for dining al fresco (above)
COCO: Noticed all of the beautiful tiles adorning the exterior of the home...what is this tile and why did you use it?
TOM: Most of the exterior tile is original. Some new tile on the stair risers and fountain were chosen by the client to blend with the old in color and pattern.
COCO: The exterior color changed too...did you have some say in this? If so, what is the color and why?
TOM: The house was re-stuccoed with an integral color plaster. The original house had been painted pink and was looking pretty shabby. The new sandy colored stucco with its natural color variations helped the house not look too new and fresh; it feels a bit weathered. We also did not go for the smooth finish that seems to be all too popular. We chose to use the original ‘light sand’ finish that existed.
Back patio after the remodel...house went from an odd light pink color to a light sand color stucco that was used in 1928 when home was constructed (above)
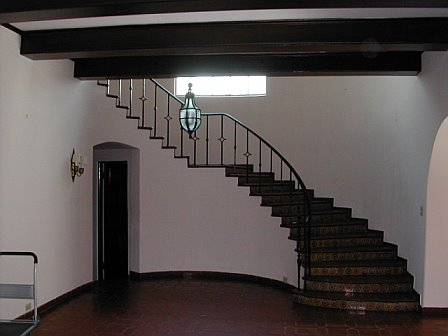
Before, inside the home, foyer with main staircase seems dark and dingy. (above)
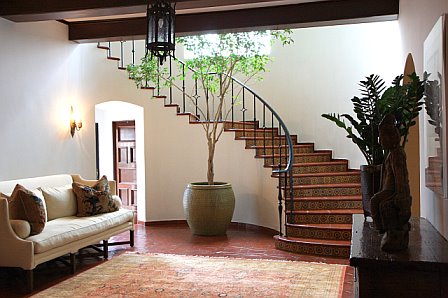
After, New lighting, a fresh coat of paint and some decorative accents which include a light colored settee and rug provide simple fixes to brighten and lighten the home's main entryway. (above)
COCO: Inside there is so much to talk about...let's start with the entryway since it is the first thing anyone sees...the transformation is fantastic (definitely brightened up)...tell us what you did to improve this space?
TOM: Honestly, we did next to nothing in the front hall other than clean up the materials and put in new lighting. It was a great space, and we didn’t want to change a thing. We even reused some of the old light fixtures.
One other thing that helped to brighten the space was to replace the old solid back door (under the stairs in thelittle vestibule) with a new wrought iron and glass door.The iron reflects the iron railing details on the stair caseand lets in some much needed light

Before, Living room had good bones with hardwood floors, an arched doorway and good light...but an uninspired beamed and panelled ceiling was a distraction in the room. (above)
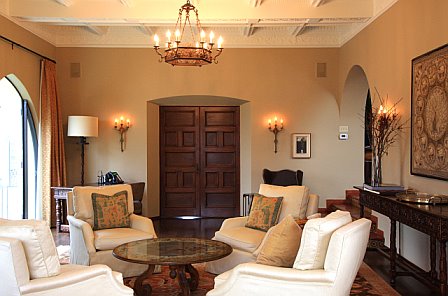
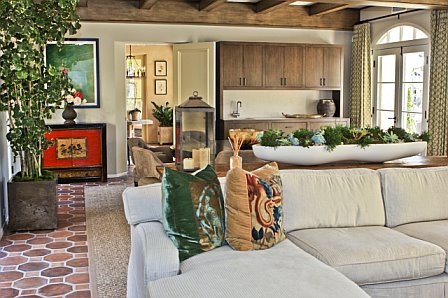
After, living room is made over to embrace the home's 1920's charm featuring four white timeless armchairs surrounding a large round coffee table (above)
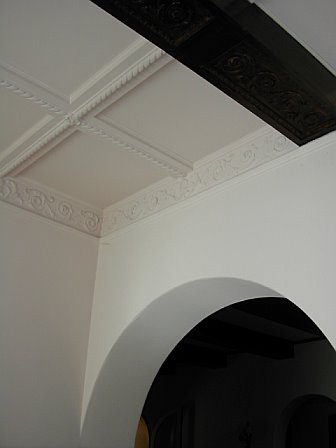
COCO: In the living room, the ceiling is amazing...really a focal point...what did you do to the ceiling to make it visually impactful?
TOM: This was a great story. We all thought “what a beautiful ceiling” when they bought the house. With much trepidation, we decided to make holes in the ceiling to install new can lights centered in a few of the panels. The worker cut the first round hole and looked up and saw a lot of detail. They decided to remove the entire panel only to discover beautiful plaster work and moulding up inside. They removed a couple other panels in other parts of the room to see if it was consistent throughout. It was. So the client gave the go-ahead to take out all the panels and restore the existing ornate plaster coffered ceiling. Most of it was in excellent condition, so although it was a lot of work because of the intricacy, little repair was required. Then it all got a fresh paint job and came out like new. This ceiling really is the jewel of the house.
 Before, Living room ceiling features square panels and dark wood beams (above)
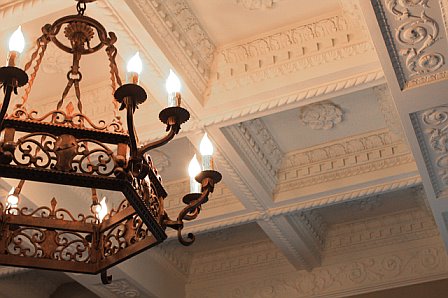
After, original ornate coffered living room ceiling was discovered behind old ceiling panels. A large Spanish inspired iron chandelier now hangs from the ceiling to accent the room's main point of interest (above).
COCO: Please talk about what materials and work went into building out this gorgeous kitchen (cabinets, counters, backsplash, windows, doors)? Was it a total remodel? Was anything salvageable?
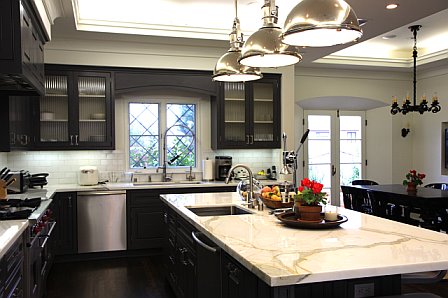
TOM: The old ‘70s kitchen was disgusting. It all had to go including a dumb-waiter and laundry shoot. Much of the new kitchen style came from some images that the client had collected including the color palette and cabinet details. Although I warn against using marble (lots of care, stains easily, etc.), they really wanted it and it did turn out great. They chose Calcutta Gold which is similar to but warmer than Carrera. The cabinet paint is a dark blue-brown color, Benj. Moore “Iron Mountain”. The floor was going to be a patterned tile, but no one could find just the right thing, so they opted for wood. Tile was always difficult because the kitchen abuts the entry hall with old glazed terra cotta tiles, the courtyard with unfinished concrete terra cotta colored tile, and the dining room which is wood. Finding something to work with all these adjacent materials was not easy. Wood worked out the best, and it ended up giving more warmth to the room.
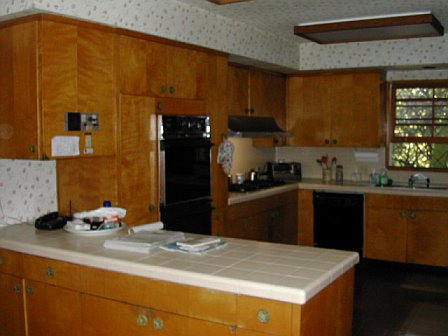
Before, Kitchen featured outdated honey colored wood cabinets, tiled countertops and lots of floral wallpaper (above)

After, Calcutta Gold marble countertops, dark brown painted wood cabinets, new windows, a subway tile backsplash, pendant kitchen island lighting and high end appliance finish off this gourmet designer kitchen (above and below)
COCO: Was there much work to do on the master bedroom? If so, what (i.e. mantel, windows, arches etc.)?
TOM: The fireplace was bad so we created a simpler better new one and used tiles for the surround that the client found. The largest work was replacing the small window that was shoved in the corner with a matching window to the one on the other side of the fireplace. One room should not have too many differently sized windows. And some how we made it all make sense on the outside too. The arch was there and we matched in at the entry hall of the master suite.
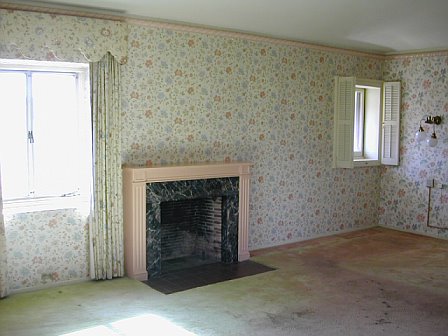
Before, master bedroom was covered in floral wallpaper and old carpet. A fireplace with an unimaginative mantel is lost in all of the drab detail (above)
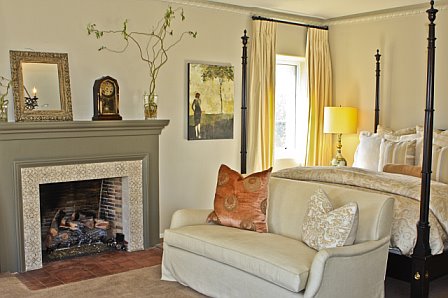
After, master bedroom gets a new fireplace surround, fresh paint, hardwood floors and an overall much need facelift! (above)
Before. old wood panelled guest room becomes in the new master bath (above)
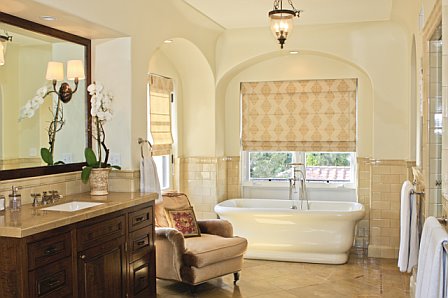
After, walls were knocked down to create a large and luxurious master bath that features a stand alone tub as its centerpiece (above)
COCO: What about the master bath? What was done there?
TOM: The master bath and closet suite was made from two bathrooms, a bedroom, some closets, and three hallways. There was a bit of a rats maze going on and none of it was doing them any good. We actually simplified things considerably and now they have a grand master suite that is completely private. The master bath tub got the prime corner location.
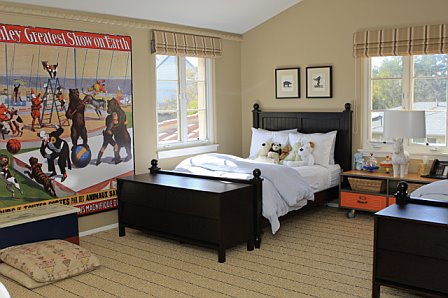
After, kids' bedroom features dark wood beds with trunks at foot for toy storage and extra seating (above)
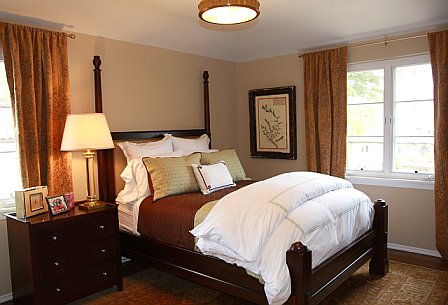
After, guest room (above)
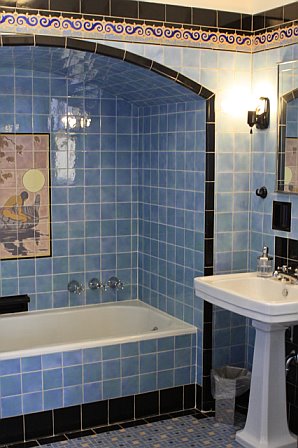 Guest bathroom has original blue and black tiles (above)
COCO: Love the blue bathroom? Was any work done there?
TOM: The blue and yellow bathrooms are exactly as it. The only things that were replaced were the sinks, toilets and light fixture. These rooms were so good, nothing needed to be done and it would have been a shame to loose them.
 Before, old garage exterior (above)
After, exterior of old garage which is now the outside of the new media room overlooking the new pool. Arched garage doors are now gorgeous large arched French doors (above)
COCO:How did you build out the media room?
TOM: This was the original four-car garage. We added two sets of French doors onto the center courtyard which turned out to be the most major structural element of the whole project. The wall along the courtyard ended up looking like the Brooklyn Bridge with as much steel as it had. The problem was the 12” thick un-reinforced masonry walls which had to be seismically upgraded to allow for the new openings. The room has radiant heated floors, a large A/V closet with all the TV and audio equipment, a bathroom that connects to the pool area and lots of storage. We designed the freestanding kitchenette with the client and interior designer. The modern twist added a nice contrast to the traditional ceiling and arched windows, and was used again on the cabinet below the TV.
COCO: Does the home now have a garage?
TOM: A new 3-car garage that is entered directly from the street. Although it takes up square footage on the lot, it makes a nice third wall to the entry courtyard and gives the pool area lots of privacy from the street.

Before, inside old garage (above)
After, inside media room which was once the home's garage (above and below)
COCO: Overall, what is your favorite room in this house? Why?
TOM: Of course the kitchen because it big, well suited for cooking, has plenty of work space and room for people to gather. The master bath is also great as is the media room. But then the living and dining rooms are fantastic too. Too hard to choose.
No need to choose Tom...the whole house, from inside to out, is a fantastic design and remodel accomplishment.
The talented team responsible for this full home remodel are as follows:
Once again, thank you, thank you Tom for the inside scoop on a wonderful remodel. Look forward to seeing more from Newman & Wolen in the New Year.
Photos in this post courtesy of Newman & Wolen Design, LLC

After remodel, a Spanish tiled covered walkway with columns, arches and beams leads from the front door of a Los Angeles, California home to an ornate iron gate that opens onto a posh patio and pool area. (above)
Thought I would start off the New Year with a magnificent mega house makeover from architects Tom Newman and Debbie Wolen of Newman & Wolen Design, LLC. This talented architecture and design team was able to miraculously transform an outdated California Spanish style fixer upper into a wonderful high style home.
This house's redo is so amazing...the home was featured on HGTV's “Get Out, Way Out”; the topic was exterior living spaces and how the architects redefined and rearranged them.
From outdoor to indoor, inside and out, Tom and Debbie imagined and realized a beautiful new space...making it a private gated charming updated vintage getaway and living space in the middle of the hustle and bustle of Los Angeles. A California dreamy, 6500 square foot, 4 bedroom home with maid's quarter's, a mother-in-law suite, a media room, finished basement, pool and so much more.
There are so many interesting stories to tell about this home's renovation...including an amazing embellished coffered ceiling found in the living room and an old garage that was cleverly remodeled into a fab modern media room.
To delve deeper and find out the full scoop, as usual, I asked architect Tom a million and half questions in a Nbaynadamas Q&A. As usual, Tom graciously told the story of this total home remodel. Here goes...
COCO: How did you get involved in this project?
TOM: The client’s contractor, Gregory Greenwood, with whom we’d worked on previous projects, thought we would be a good match for this house and client. We and Greg had worked on other Spanish style homes and both have an appreciation for these grand old houses and wonderful details.
COCO: Where is this home located in Los Angeles?
TOM: It is in the Cheviot Hills neighborhood of LA. There are several other great old homes in this area, but few are as stately as this one.
COCO: When was the home built?
TOM: 1928. A few bad remodels had happened since then; the worst being a typically ‘70s kitchen with fluorescent ceiling.
COCO: What was the goal of the project (minor remodel, remodel, total renovation, exterior, interior etc.)?
TOM: It started out as a minor remodel; new kitchen and master suite. It kept growing and growing. It was the typical situation where the client needs to determine if they want to do the piecemeal renovations over a long period of time, or make one big mess and be done. They chose the latter, but it still took a long time. Several things that seemed simple became much more complicated than anyone had hoped. Combining the old kitchen and breakfast room into one became a huge task because we had to remove a bearing wall and add a large steel beam and posts. These sorts of things can mess up the ceilings and lighting plans, but I think we managed to make it so everything seemed intentional and appropriate. Only we know the craziness behind finished walls and ceilings.
COCO: What exterior element are you most proud of now that home is complete?
TOM: The client had an image of a grillwork made from stacked clay roof tiles in sort of a fish scale pattern. It did not work were she had hoped it might (by the pool), but we used it at the entry courtyard and it think it looks great. It give the front wall some transparency and adds texture and color to what would have been a big blank wall. I also insisted they put in the fountain in the center courtyard. There was an opening in the wall that I wanted to take advantage of, and doesn’t every courtyard need a water feature? The walls of the house are all 12” thick masonry, so when you already have a hole there, you have to use it for something. I love it. Not sure if they love it as much as I do.

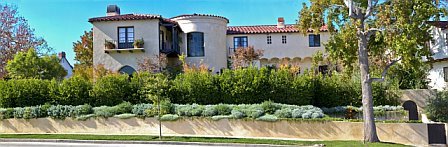
Front exterior of Cheviot Hills, California home. (above)

After, Side view of exterior of house from sidewalk features, the stacked Spanish roof tile grill in the perimeter wall, the new garage with arched doors and a carved wood gate entry door.

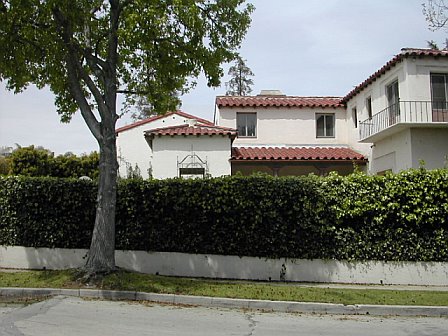
Before, side view of home from street featured a hedge and no way of accessing the home's inner courtyard. (above)


Before, the pool area was covered over to make the home's front entry way. The old patio entrance to the home with columns became the new front entry.(above)

Before, original auto court entry. (above)

COCO: What did you do architecturally to the exterior?
TOM: The exterior changed very little on the main house. We added a new metal cap to the main chimney that mimicked the pointed arch shape of the living room windows. We added wood beams under the old cantilevered balconies because they looked to flimsy and unstable as they were. Other things changed because rooms were repurposed. The old four car garage became a large media/family room. We kept three of the arched openings and infilled them with glass doors and with transoms. We then built a new garage with changed the look of the property from the street. The new structure reflects the style of the house and old garage, and even reused some old pieces from the main house. Old cast stone grills and wrought iron were placed on the new garage to make it feel like it had always been there. The main changes to the house were the reorganization of the exterior spaces. We removed an old ‘70s swimming pool and created a new entry courtyard which allowed us to use the original front entry door for what it was intended. (The property was subdivided some years ago and a diminutive side door became the front entrance; it never really was in keeping with the grandeur of the entry hall and rest of the living spaces to enter through the funny little door at the base of the stair tower.)
Also, the old driveway became the new pool and patio. The front yard became a walled side yard and sport court where the kids could play freely. And a divided central courtyard and back service area became a large exterior room in the middle of the house; much of the family living takes place here and an underutilized outdoor fireplace now has center stage.

Before, Front entryway of home (above)

After, former front entry turns into a back patio with views of the grass and green lush backyard (above)

Before, Kitchen courtyard was small, closed off and not a useful outdoor living space (above)

After, Kitchen courtyard is built out to include a tile patio and an outdoor fireplace perfect for dining al fresco (above)
COCO: Noticed all of the beautiful tiles adorning the exterior of the home...what is this tile and why did you use it?
TOM: Most of the exterior tile is original. Some new tile on the stair risers and fountain were chosen by the client to blend with the old in color and pattern.
COCO: The exterior color changed too...did you have some say in this? If so, what is the color and why?
TOM: The house was re-stuccoed with an integral color plaster. The original house had been painted pink and was looking pretty shabby. The new sandy colored stucco with its natural color variations helped the house not look too new and fresh; it feels a bit weathered. We also did not go for the smooth finish that seems to be all too popular. We chose to use the original ‘light sand’ finish that existed.

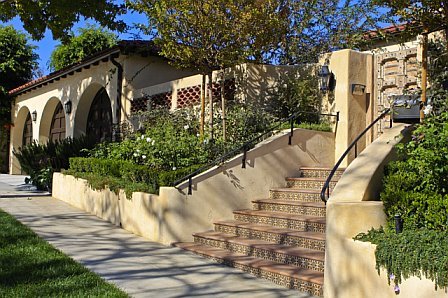
Back patio after the remodel...house went from an odd light pink color to a light sand color stucco that was used in 1928 when home was constructed (above)

Before, inside the home, foyer with main staircase seems dark and dingy. (above)

After, New lighting, a fresh coat of paint and some decorative accents which include a light colored settee and rug provide simple fixes to brighten and lighten the home's main entryway. (above)
COCO: Inside there is so much to talk about...let's start with the entryway since it is the first thing anyone sees...the transformation is fantastic (definitely brightened up)...tell us what you did to improve this space?
TOM: Honestly, we did next to nothing in the front hall other than clean up the materials and put in new lighting. It was a great space, and we didn’t want to change a thing. We even reused some of the old light fixtures.
One other thing that helped to brighten the space was to replace the old solid back door (under the stairs in thelittle vestibule) with a new wrought iron and glass door.The iron reflects the iron railing details on the stair caseand lets in some much needed light

Before, Living room had good bones with hardwood floors, an arched doorway and good light...but an uninspired beamed and panelled ceiling was a distraction in the room. (above)

After, living room is made over to embrace the home's 1920's charm featuring four white timeless armchairs surrounding a large round coffee table (above)
COCO: In the living room, the ceiling is amazing...really a focal point...what did you do to the ceiling to make it visually impactful?
TOM: This was a great story. We all thought “what a beautiful ceiling” when they bought the house. With much trepidation, we decided to make holes in the ceiling to install new can lights centered in a few of the panels. The worker cut the first round hole and looked up and saw a lot of detail. They decided to remove the entire panel only to discover beautiful plaster work and moulding up inside. They removed a couple other panels in other parts of the room to see if it was consistent throughout. It was. So the client gave the go-ahead to take out all the panels and restore the existing ornate plaster coffered ceiling. Most of it was in excellent condition, so although it was a lot of work because of the intricacy, little repair was required. Then it all got a fresh paint job and came out like new. This ceiling really is the jewel of the house.


After, original ornate coffered living room ceiling was discovered behind old ceiling panels. A large Spanish inspired iron chandelier now hangs from the ceiling to accent the room's main point of interest (above).
COCO: Please talk about what materials and work went into building out this gorgeous kitchen (cabinets, counters, backsplash, windows, doors)? Was it a total remodel? Was anything salvageable?
TOM: The old ‘70s kitchen was disgusting. It all had to go including a dumb-waiter and laundry shoot. Much of the new kitchen style came from some images that the client had collected including the color palette and cabinet details. Although I warn against using marble (lots of care, stains easily, etc.), they really wanted it and it did turn out great. They chose Calcutta Gold which is similar to but warmer than Carrera. The cabinet paint is a dark blue-brown color, Benj. Moore “Iron Mountain”. The floor was going to be a patterned tile, but no one could find just the right thing, so they opted for wood. Tile was always difficult because the kitchen abuts the entry hall with old glazed terra cotta tiles, the courtyard with unfinished concrete terra cotta colored tile, and the dining room which is wood. Finding something to work with all these adjacent materials was not easy. Wood worked out the best, and it ended up giving more warmth to the room.

Before, Kitchen featured outdated honey colored wood cabinets, tiled countertops and lots of floral wallpaper (above)

After, Calcutta Gold marble countertops, dark brown painted wood cabinets, new windows, a subway tile backsplash, pendant kitchen island lighting and high end appliance finish off this gourmet designer kitchen (above and below)

COCO: Was there much work to do on the master bedroom? If so, what (i.e. mantel, windows, arches etc.)?
TOM: The fireplace was bad so we created a simpler better new one and used tiles for the surround that the client found. The largest work was replacing the small window that was shoved in the corner with a matching window to the one on the other side of the fireplace. One room should not have too many differently sized windows. And some how we made it all make sense on the outside too. The arch was there and we matched in at the entry hall of the master suite.

Before, master bedroom was covered in floral wallpaper and old carpet. A fireplace with an unimaginative mantel is lost in all of the drab detail (above)

After, master bedroom gets a new fireplace surround, fresh paint, hardwood floors and an overall much need facelift! (above)

Before. old wood panelled guest room becomes in the new master bath (above)

After, walls were knocked down to create a large and luxurious master bath that features a stand alone tub as its centerpiece (above)
COCO: What about the master bath? What was done there?
TOM: The master bath and closet suite was made from two bathrooms, a bedroom, some closets, and three hallways. There was a bit of a rats maze going on and none of it was doing them any good. We actually simplified things considerably and now they have a grand master suite that is completely private. The master bath tub got the prime corner location.

After, kids' bedroom features dark wood beds with trunks at foot for toy storage and extra seating (above)

After, guest room (above)

COCO: Love the blue bathroom? Was any work done there?
TOM: The blue and yellow bathrooms are exactly as it. The only things that were replaced were the sinks, toilets and light fixture. These rooms were so good, nothing needed to be done and it would have been a shame to loose them.


After, exterior of old garage which is now the outside of the new media room overlooking the new pool. Arched garage doors are now gorgeous large arched French doors (above)
COCO:How did you build out the media room?
TOM: This was the original four-car garage. We added two sets of French doors onto the center courtyard which turned out to be the most major structural element of the whole project. The wall along the courtyard ended up looking like the Brooklyn Bridge with as much steel as it had. The problem was the 12” thick un-reinforced masonry walls which had to be seismically upgraded to allow for the new openings. The room has radiant heated floors, a large A/V closet with all the TV and audio equipment, a bathroom that connects to the pool area and lots of storage. We designed the freestanding kitchenette with the client and interior designer. The modern twist added a nice contrast to the traditional ceiling and arched windows, and was used again on the cabinet below the TV.
COCO: Does the home now have a garage?
TOM: A new 3-car garage that is entered directly from the street. Although it takes up square footage on the lot, it makes a nice third wall to the entry courtyard and gives the pool area lots of privacy from the street.

Before, inside old garage (above)

After, inside media room which was once the home's garage (above and below)

COCO: Overall, what is your favorite room in this house? Why?
TOM: Of course the kitchen because it big, well suited for cooking, has plenty of work space and room for people to gather. The master bath is also great as is the media room. But then the living and dining rooms are fantastic too. Too hard to choose.
No need to choose Tom...the whole house, from inside to out, is a fantastic design and remodel accomplishment.
The talented team responsible for this full home remodel are as follows:
- Newman & Wolen Design, LLC, Residential & Commercial Architecture, 310-558-3100
- Gregory Greenwood of GPG Inc. Construction, 310-360-6173
- Brooke Gardner Interior Design, (818) 917-2012
- Heather Trilling Landscape & Design, (310) 390-4648
- Jose Martinez Engineering, (310) 728-9820
Once again, thank you, thank you Tom for the inside scoop on a wonderful remodel. Look forward to seeing more from Newman & Wolen in the New Year.
Photos in this post courtesy of Newman & Wolen Design, LLC
You have read this articleBEFORE AND AFTER /
Nbaynadamas
with the title BEFORE AND AFTER: A SPECTACULAR HOME MEGA MAKEOVER FOR THE NEW YEAR!. You can bookmark this page URL http://nbaynadamas.blogspot.com/2009/01/before-and-after-spectacular-home-mega.html. Thanks!
Write by:
AN - Monday, January 5, 2009


Comments "BEFORE AND AFTER: A SPECTACULAR HOME MEGA MAKEOVER FOR THE NEW YEAR!"
Post a Comment